UnRAID - Configuration
Contents
Required Home Assistant Configuration
input_text:
  card_containers:
    initial: Containers
  software_version:
    initial: Version
Picture Elements Card
HKI requires this image
![]() )
)
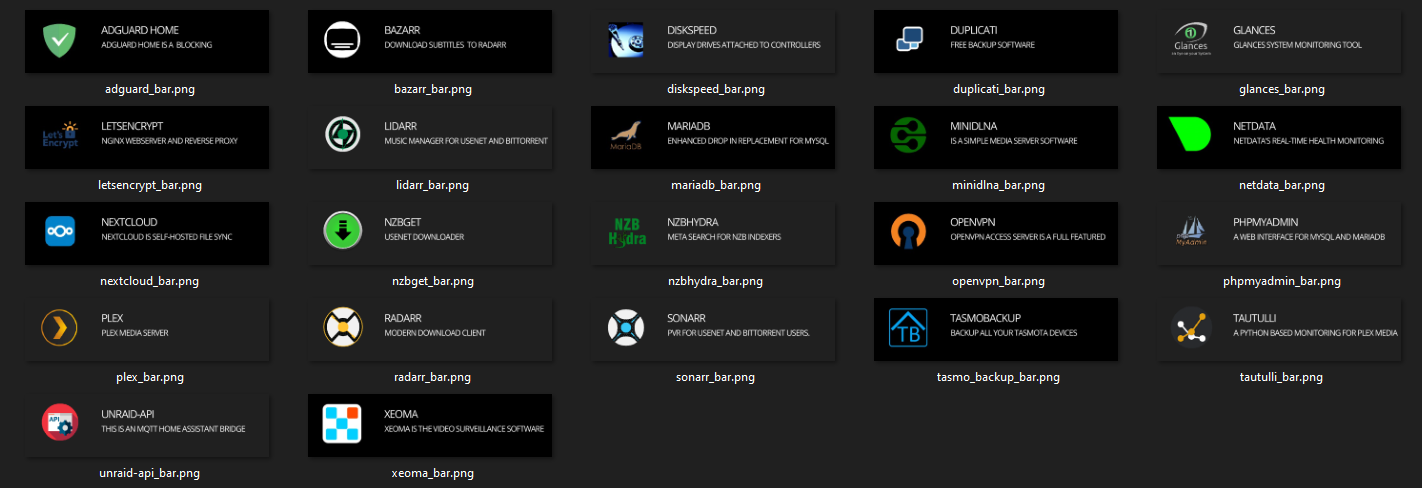
Containers Swipe-Card
These images can be used for the containers, please use template_dwains.psd to create your own.
Install Bar-Card > 3.0.5
Bar-Card 3.0.5 and above is required to be installed from HACs and added to your resources file for either Dwains-Theme or Homekit-Infused
# Bar Card
  - url: /hacsfiles/bar-card/bar-card.js
    type: module
Setup MQTT on Home Assistant
Im not going to go through the setup for MQTT as there is plenty of guides out there. If you are running Home Assistant (Hassio) Docker then you can just install the addon package. and the integration.
These need to be configured and working before you proceed to configure the UnRAID-API
- Mosquitto broker
- MQTT Integration
When setting up the MQTT integration, ensure that you tick the box to enable discovery.
Home Assistant have documentation here on the add-on package.
Test you can connect to the MQTT instance
mosquitto_sub -h 192.168.1.201 -u 'username' -P 'password' -t "#"
Setup Glances for UnRAID
Requirements:
- Glances Docker Container installed on UnRAID
- Glances Integration for Home Assistant setup to pull data from UnRAID
UNRAID-API Container Configuration
Install the UnRAID-API on your UnRAID server, this can alo be installed from the UnRAID App Store.

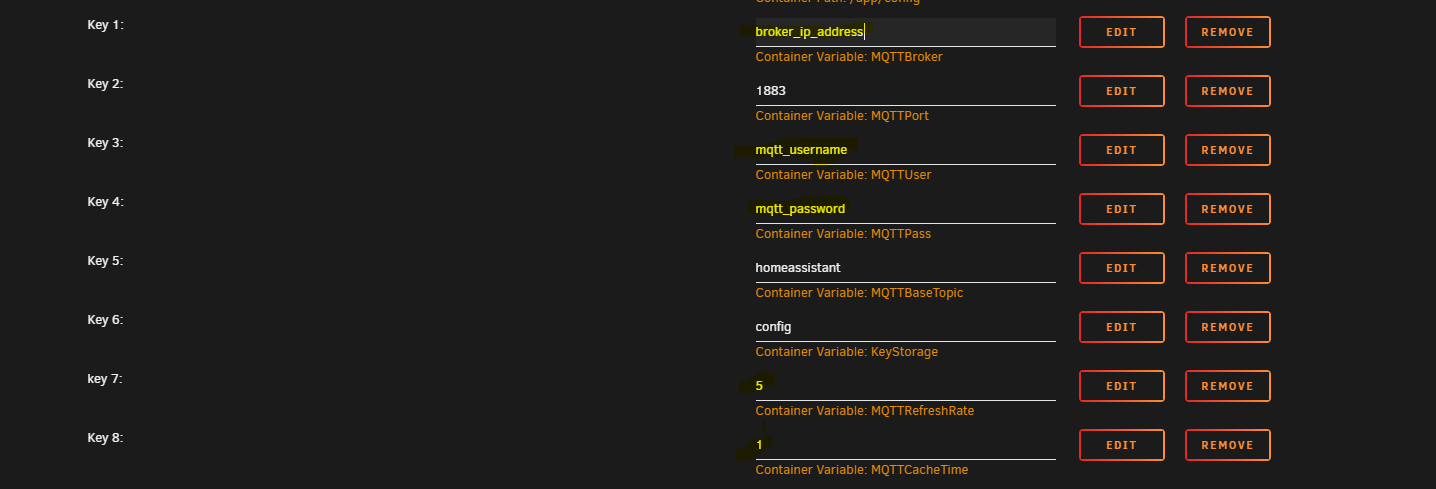
When you get to the configuration screen for the container following keys need to be added to the default container configuration
| Name | Type | Default | Description |
|---|---|---|---|
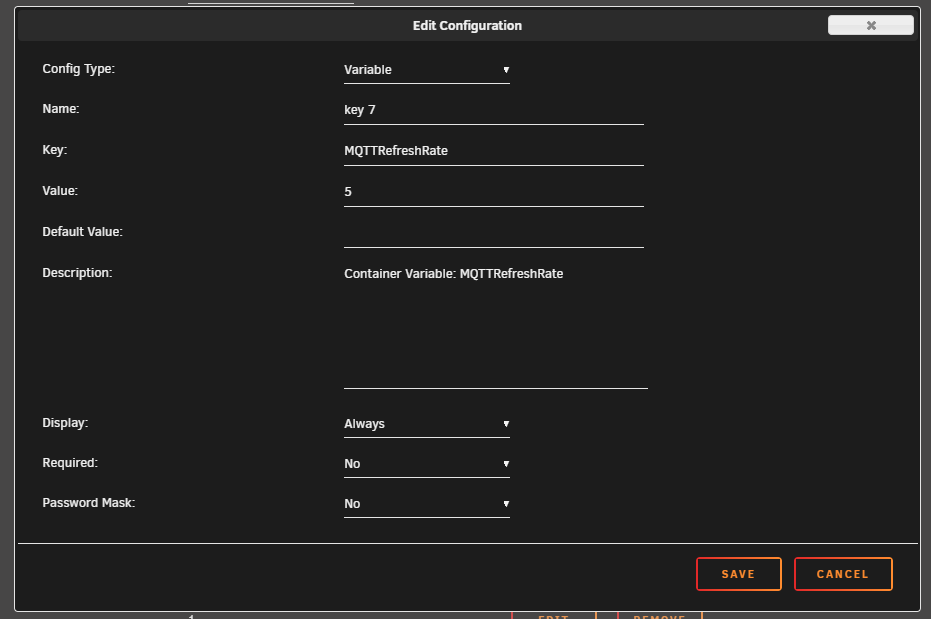
| MQTTRefreshRate | number | 5 | Time in seconds to poll for updates |
| MQTTCacheTime | number | 1 | Time in minutes after which all entities will be updated in MQTT |
As an example this is the value for key 7, you will need to replicate it for key 8 found in the table above.
You will also need to configure your MQTT Broker, replacing the fields marked in Yellow.
Starting The Container
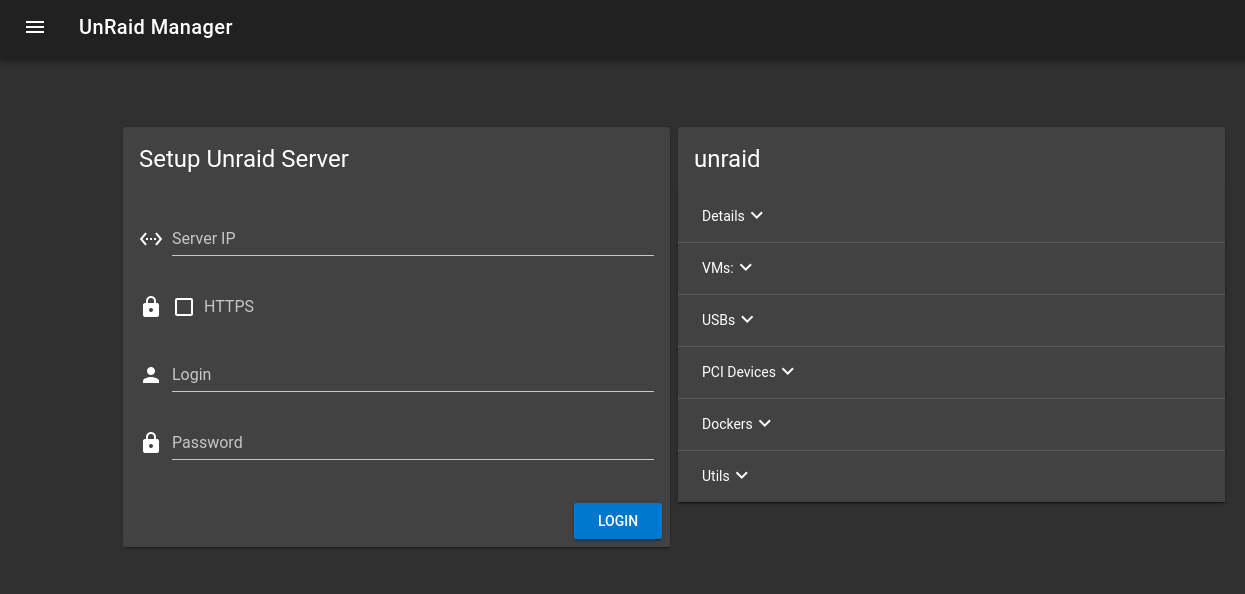
When you start the container for the first time you must browse to the login screen of the UnRAID-API Web-UI and login with your UnRAID credentials. If this step is missed the API will not work.
Check Home Assistant
Once the UnRAID-API container is up and running check the mqtt integration, you should now have some UnRAID entities. If not please reboot your Home Assistant instance, once your Home Assistant instance has rebooted wait at least 3 minutes for entities to appear in the integration.

Setting Up Sensors
You need the following Sensors to be configured in Home Assistant for the view to to collect:
- arrayStatus
- arrayProtection
- diskSpace
- latestRelease
UnRAID SNMP Configuration
Credits
- Stephan Suggested this plugin, assisted finding SNMP sensors, provided code snips
Testers
Install Perl for UnRAID
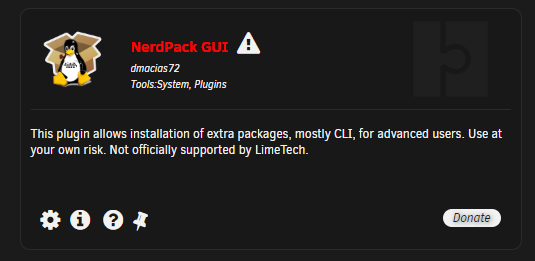
Install NerdPack GUI from the UnRAID community store
Next go to plugins and click on the NerdPack plugin icon, scroll down the list and enable ‘perl-5.30.1-x86_64-1.txz’

Install the UnRAID SNMP Plugin
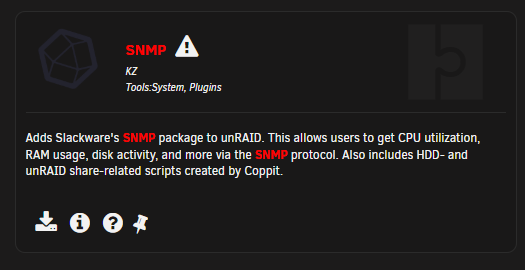
Install ‘SNMP’ from the community store
Run a test query to confirm SNMP is working correctly
Make sure you run these queries to ensure the plugin is working correctly.
snmpwalk -v 2c localhost -c public 'NET-SNMP-EXTEND-MIB::nsExtendOutLine."disktemp"'

snmpwalk -On -v 2c localhost -c public 'NET-SNMP-EXTEND-MIB::nsExtendOutLine."disktemp"'

Make a note of the OID
.1.3.6.1.4.1.8072.1.3.2.4.1.2.8.100.105.115.107.116.101.109.112.1
Make a note of the disk serial numbers and match it to the disk number in UnRAID
STRING: **ST6000VN0033-2EE110_ZAD4BDGE**

Create a SNMP sensor in your config
This Sensor will only show the numerical value of the output.
- platform: snmp
  name: 'UnRAID PARITY Temperature'
  host: 1.2.3.4
  port: 161
  community: public
  baseoid: .1.3.6.1.4.1.8072.1.3.2.4.1.2.8.100.105.115.107.116.101.109.112.1
  accept_errors: true
  value_template: >

  unit_of_measurement: '°C'
Building a snmpwalk query string
All the SNMP Mib values can be found on your UnRAID sever in:
/usr/share/snmp/mibs
You need to ‘cat’ the ‘.txt’ file and locate the sensors
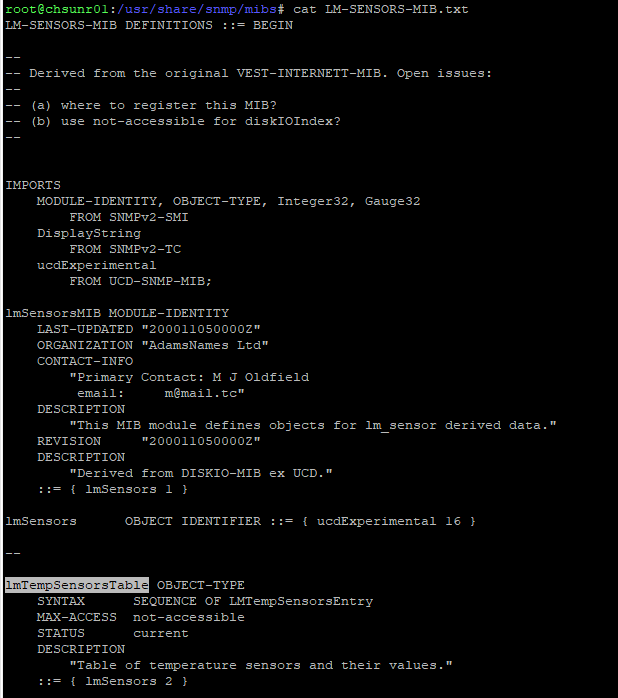
You can then string together the ‘snmpwalk’ commad
| Intial command | MIB-FILE-NAME | Sensor Name |
|---|---|---|
| snmpwalk -v 2c -On -c public localhost | LM-SENSORS-MIB:: | lmTempSensorsTable |
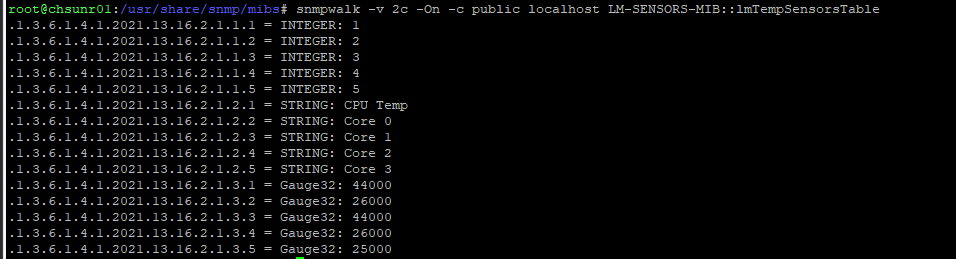
snmpwalk -v 2c -On -c public localhost LM-SENSORS-MIB::lmTempSensorsTable
This query is split up into 3 sections
- INTEGER
- STRING
- GAUGE
These can then be matched with the corresponding OID. In the example below the ‘INTEGER’, ‘STRING’ & Gauge32 all belong to CPU TEMP
.1.3.6.1.4.1.2021.13.16.2.1.1.1 = INTEGER: 1
.1.3.6.1.4.1.2021.13.16.2.1.2.1 = STRING: CPU Temp
.1.3.6.1.4.1.2021.13.16.2.1.3.1 = Gauge32: 44000
In this example they all belong to Core 0
.1.3.6.1.4.1.2021.13.16.2.1.1.2 = INTEGER: 2
.1.3.6.1.4.1.2021.13.16.2.1.2.2 = STRING: Core 0
.1.3.6.1.4.1.2021.13.16.2.1.3.2 = Gauge32: 26000
- platform: snmp
    name: 'UNRAID CPU TEMP'
    host: 1.2.3.4
    port: 161
    community: public
    baseoid: .1.3.6.1.4.1.2021.13.16.2.1.3.19
    accept_errors: true
    unit_of_measurement: '°C'
    value_template: '0'
Some of the sensor I have created can be found in my config here.
Some of the sensors discovered to far…
I’ll add more sensors here as time goes on and as I go through and discover them. If you find any good ones please contact me on the HKI discord and I’ll be sure to add them.
Running the command without the -On switch gives you an idea what numerical value links to each physical piece of hardware as shown in the commands below for Temperature, Fan, Disk/Share.
Temperature Sensors
snmpwalk -v 2c -c public localhost LM-SENSORS-MIB::lmTempSensorsTable
snmpwalk -On -v 2c -c public localhost LM-SENSORS-MIB::lmTempSensorsTable
Fan RPM
snmpwalk -v 2c -c public localhost LM-SENSORS-MIB::lmFanSensorsTable
snmpwalk -On -v 2c -c public localhost LM-SENSORS-MIB::lmFanSensorsTable
Disk/Share Info
snmpwalk -v 2c -c public localhost NET-SNMP-EXTEND-MIB::nsExtendOutLine
snmpwalk -On -v 2c -c public localhost NET-SNMP-EXTEND-MIB::nsExtendOutLine
Network
To capture the network adaper vaules you need to use ::ifDescr
Description
snmpwalk -v 1 localhost -c public IF-MIB::ifDescr
Upload
snmpwalk -On -v 1 localhost -c public IF-MIB::ifOutOctets
Download
snmpwalk -On -v 1 localhost -c public IF-MIB::ifInOctets
Errors
Various system related errors
snmpwalk -On -v 2c localhost -c public systemStats
Linux SNMP OIDs for CPU,Memory and Disk Statistics
CPU Statistics
Load
1 minute Load: .1.3.6.1.4.1.2021.10.1.3.1
5 minute Load: .1.3.6.1.4.1.2021.10.1.3.2
15 minute Load: .1.3.6.1.4.1.2021.10.1.3.3
CPU
percentage of user CPU time: .1.3.6.1.4.1.2021.11.9.0
raw user cpu time: .1.3.6.1.4.1.2021.11.50.0
percentages of system CPU time: .1.3.6.1.4.1.2021.11.10.0
raw system cpu time: .1.3.6.1.4.1.2021.11.52.0
percentages of idle CPU time: .1.3.6.1.4.1.2021.11.11.0
raw idle cpu time: .1.3.6.1.4.1.2021.11.53.0
raw nice cpu time: .1.3.6.1.4.1.2021.11.51.0
Memory Statistics
Total Swap Size: .1.3.6.1.4.1.2021.4.3.0
Available Swap Space: .1.3.6.1.4.1.2021.4.4.0
Total RAM in machine: .1.3.6.1.4.1.2021.4.5.0
Total RAM used: .1.3.6.1.4.1.2021.4.6.0
Total RAM Free: .1.3.6.1.4.1.2021.4.11.0
Total RAM Shared: .1.3.6.1.4.1.2021.4.13.0
Total RAM Buffered: .1.3.6.1.4.1.2021.4.14.0
Total Cached Memory: .1.3.6.1.4.1.2021.4.15.0
Disk Statistics
The snmpd.conf needs to be edited. Add the following (assuming a machine with a single ‘/’ partition):
disk / 100000 (or)
includeAllDisks 10% for all partitions and disks
Path where the disk is mounted: .1.3.6.1.4.1.2021.9.1.2.1
Path of the device for the partition: .1.3.6.1.4.1.2021.9.1.3.1
Total size of the disk/partion (kBytes): .1.3.6.1.4.1.2021.9.1.6.1
Available space on the disk: .1.3.6.1.4.1.2021.9.1.7.1
Used space on the disk: .1.3.6.1.4.1.2021.9.1.8.1
Percentage of space used on disk: .1.3.6.1.4.1.2021.9.1.9.1
Percentage of inodes used on disk: .1.3.6.1.4.1.2021.9.1.10.1

System Uptime: .1.3.6.1.2.1.1.3.0
Sensor Examples
  - platform: snmp
    name: 'HDD Disk Usage'
    host: 1.2.3.4
    port: 161
    community: public
    baseoid: .1.3.6.1.2.1.25.2.3.1.6.31
    accept_errors: true
    unit_of_measurement: 'GB'
    value_template: '0'
- platform: snmp
  name: 'LAN Upload Sensor'
  host: 1.2.3.4
  port: 161
  community: public
  baseoid: 1.3.6.1.2.1.2.2.1.16.17
  accept_errors: true
  unit_of_measurement: "Kbps"
  value_template: '0'
- platform: snmp
  name: 'HDD Temperature Sensor'
  host: 1.2.3.4
  port: 161
  community: public
  version: 2c
  baseoid: .1.3.6.1.4.1.8072.1.3.2.4.1.2.8.100.105.115.107.116.101.109.112.1
  accept_errors: false
  value_template: >

  unit_of_measurement: '°C'